Experience Center
Creation is the process of designing and deploying Experience Centers (ECs) in Oxygen. This document presents the interface features that enable registering, modifying, deleting, importing, and exporting ECs.
Before You Begin
To create an Experience Center, you must have the appropriate access permissions.
Procedure
- To access the Experience Center functionality, go to the menu Experience Center > Experience Center Configuration > New.
Information
- In the "Information" tab, fill in the available fields:
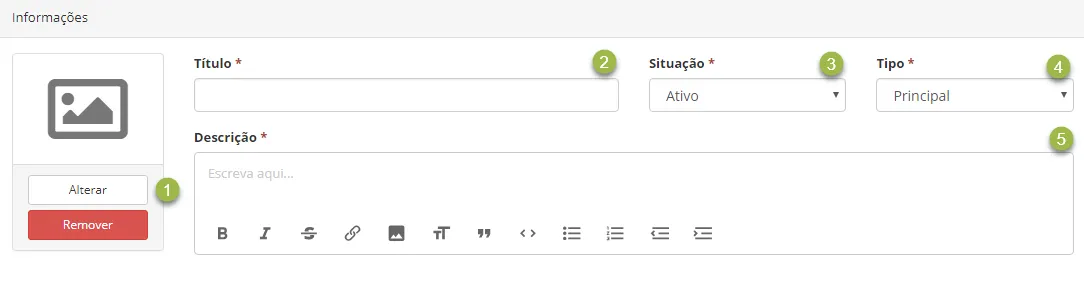
- Change – The Experience Center icon.
- Title – The name displayed to the end user.
- Status – Whether the EC is "Active" or "Inactive".
- Type – Options include Primary (ECs created as main portals) and Link (ECs created to be linked to a primary EC).
- Description – Additional text accompanying the title for user presentation.
Permissions
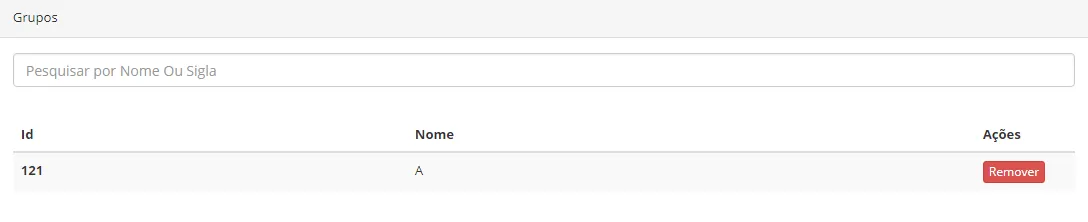
- In the "Permissions" tab, define which groups can view the Experience Center:
Construction
- In the "Construction" tab, you can visually customize the Experience Center, create sections, and add Widgets, links, or link other Experience Centers:
Visual Customization
- Use these tools to customize the EC's appearance:
- Change logo – Modify the EC logo. Recommended size:
- Change header – Modify the header image. Recommended size:
- Reset structure – Reverts all changes to the initial state.
- Grid style – Adjust the EC display:
- Fixed width – Keeps the EC centered.
- Full width – Expands the EC to the browser size.
- Logo size – Increase the logo size up to 100% of its original dimensions.
- Theme color – Change the retractable menu color (using hex codes, e.g., #777).
- Menu icon – Modify section, link, and menu icon colors (using hex codes, e.g., #777).
Design Area
In the Design Area, you can build the content to be published in the Experience Center.
- Define navigation types (with or without a menu).
- Create sections for the navigation tree (only for menu-based navigation).
- Add a menu item by clicking "+" at the end of a section.
- Configure the menu content by clicking the wrench icon.
- Select the content type (Widget, Link, or Experience Center).
Widget Type
- Select the content area size by clicking "+" and choosing an option:
100%, 50% x 50%, 33.3% x 33.3% x 33.3%, 33.3% x 66.6%, 66.6% x 33.3%, and 25% x 25% x 25% x 25%.
- Select a Widget by clicking "=+" and choosing an option.
- Click "Save" to apply changes.
- After selecting a layout, you can choose 4biz functions in widget form (see the Widgets table).
"My Services" Widget
You can select the "My Services" widget to include specific services in the EC. To add services:
- Go to "Construction" in the EC.
- Choose Widgets and select "My Services".
- The system will open the service selection option.
- Select the services to include in the EC.
- Save the widget configuration. Services can be edited or removed at any time.
Link Type
- Enter a URL to redirect users when they click the menu item.
- Click "Save" to apply changes.
Experience Center Type
- Link another EC (Type: Link) to the primary one. Search and select from the list of registered ECs.
- Click "Save" to apply changes.
Element and Widget Placement
Fixed Header

- Menu – Access other permitted ECs.
- Logo – Customizable for branding.
- Search bar – Universal search for Knowledge and Activities.
- Account options – Change language, edit profile, log out, or access the system.
Experience Center with Navigation
This structure allows creating an EC with a left-side navigation menu.
Experience Center without Navigation
This structure creates an EC using only widgets.
Available Widgets
*Some columns may not update automatically when added. If this occurs, delete and re-add the ticket widget, configuring the columns correctly.
Next Steps
Click "Preview" at the top to review the EC. Once finalized, publish it so your organization can utilize all its features.