Creating a Ticket
Administrator Attendant Applicant
A ticket is the way to register a service request in My Desk.
When you open a ticket, you inform the responsible team that you need assistance, and the system takes care of directing and monitoring the entire process until completion.
1 - Openig a new ticket

Access the My Desk
Click and select the My Desk application from the applications menu on the left.
Access the Experience Center
In the top menu, click on Experience Center.
Locate the portfolio and the activity.
Find the portfolio that contains the service for which you want to open a ticket. Click on the top menu of the desired portfolio or scroll through the page.
Clique na atividade desejada
A window will appear in the center of the screen with the necessary information to open the request. Each activity may contain different information, relevant to the service in question.
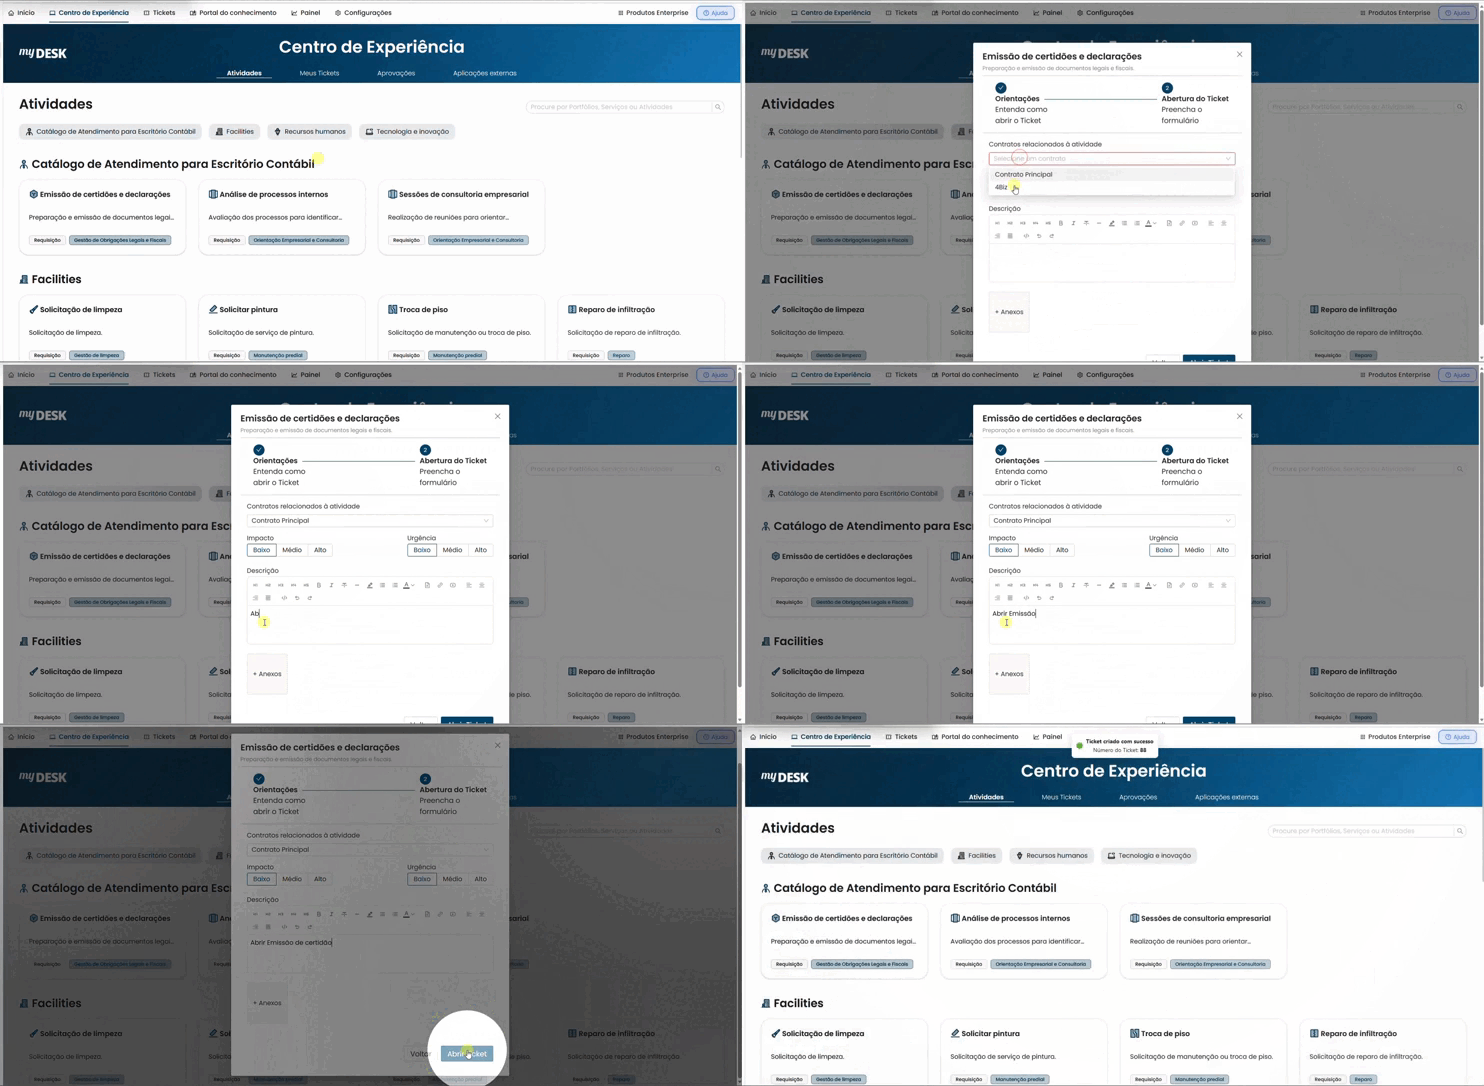
Select the contract (when necessary)
If the activity is linked to more than one contract, a selection field will appear before the form. Select the contract to which this request belongs. If the activity has only one linked contract, this field will not appear and the selection will be made automatically by the system. See more details in section 2 of this page.
Read the guidelines
The request is made in 2 stages. The first stage is the Guidance stage — carefully read the instructions on how to fill out the ticket correctly.
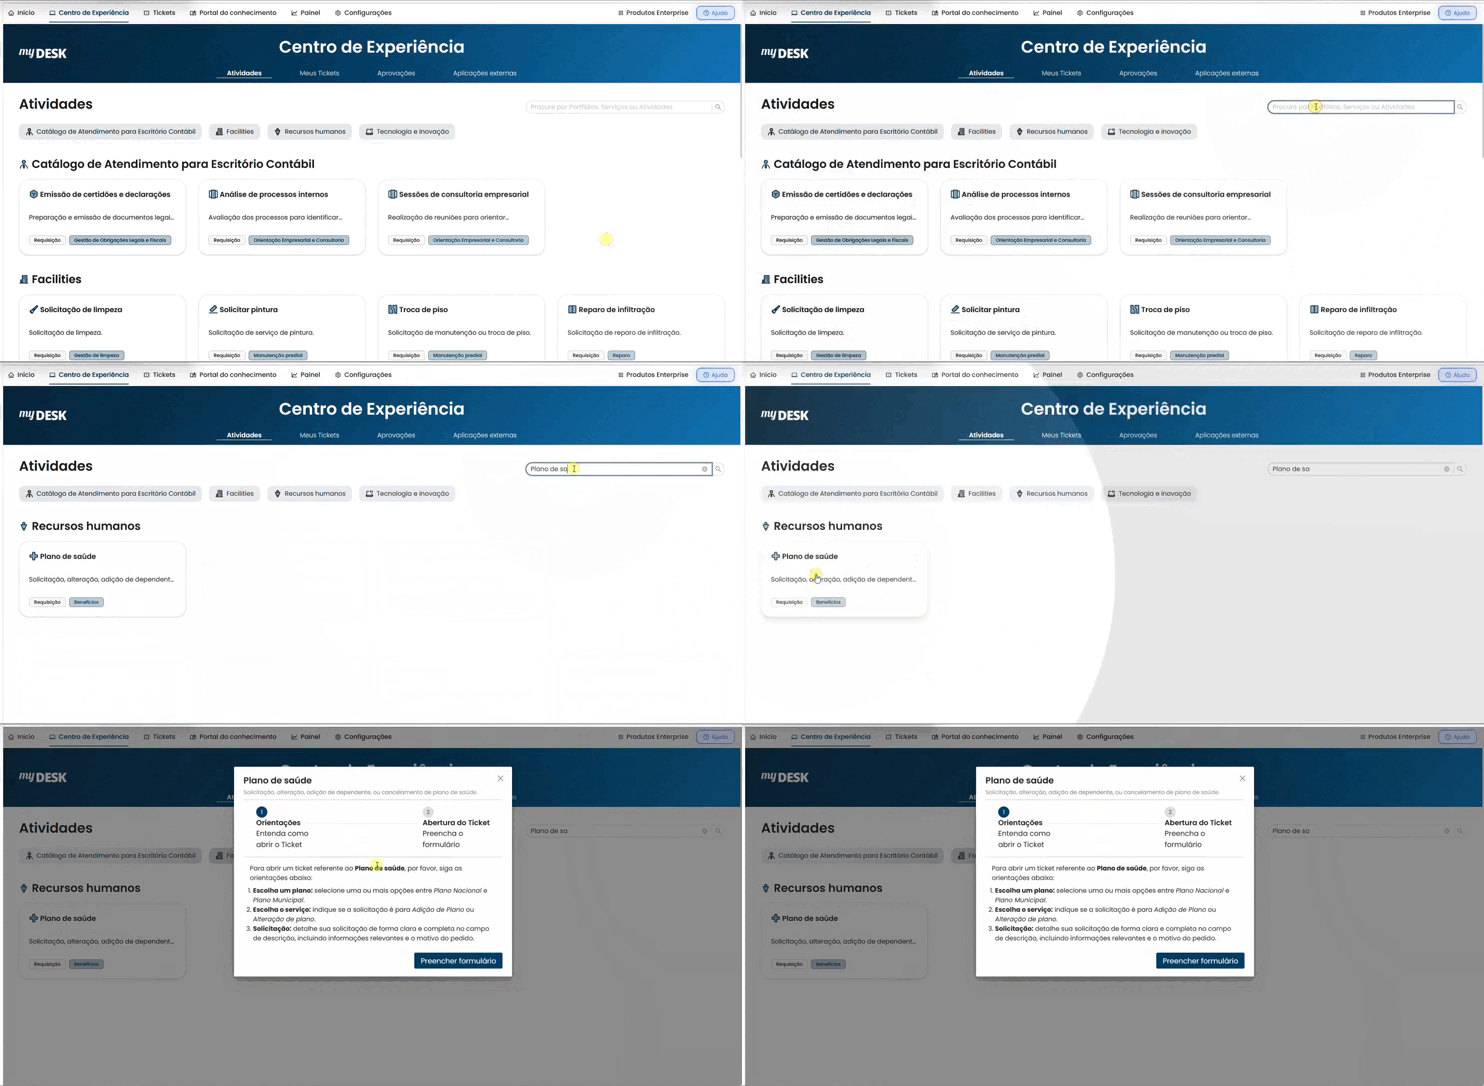
Fill out the form
Click on Fill out form to proceed to the second step. Fill in the requested information. Fields marked with * are required. See section 3 to understand how to fill in the information according to the activity's SLA type.
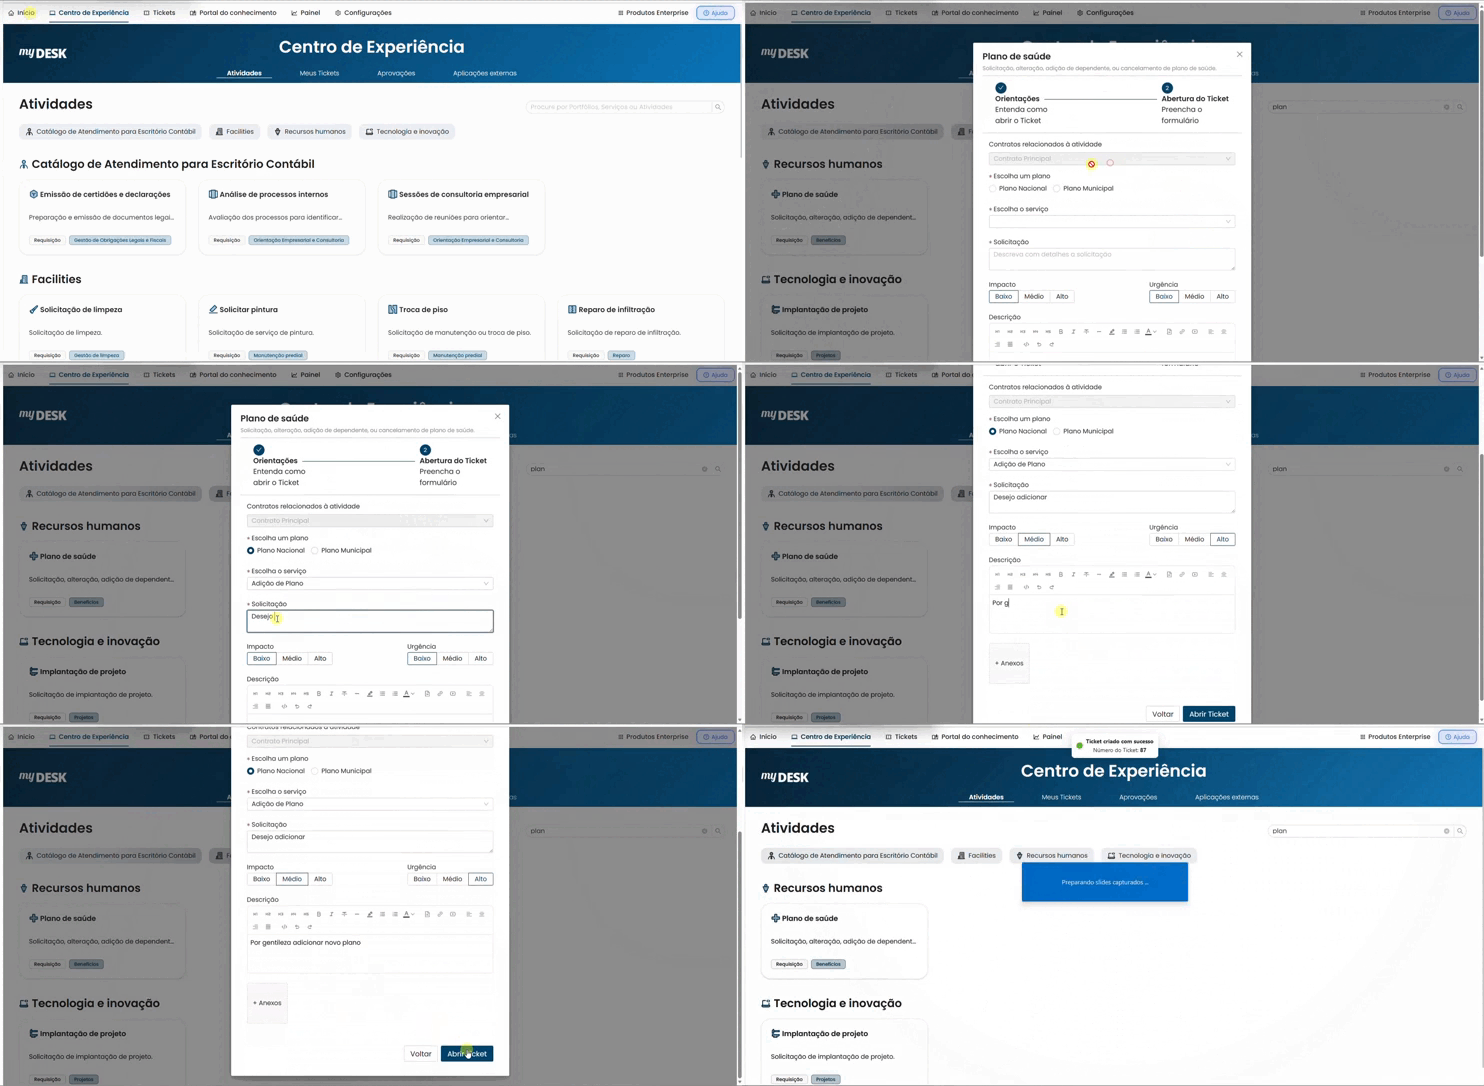
Finalize the opening.
Click Open ticket to save and finalize the opening. Upon completion, a message will appear at the top of the screen confirming that the opening was successful. Click Back to return without saving, or click outside the window or the (X) button in the upper right corner to exit without opening the ticket.
✅Your ticket has been created!
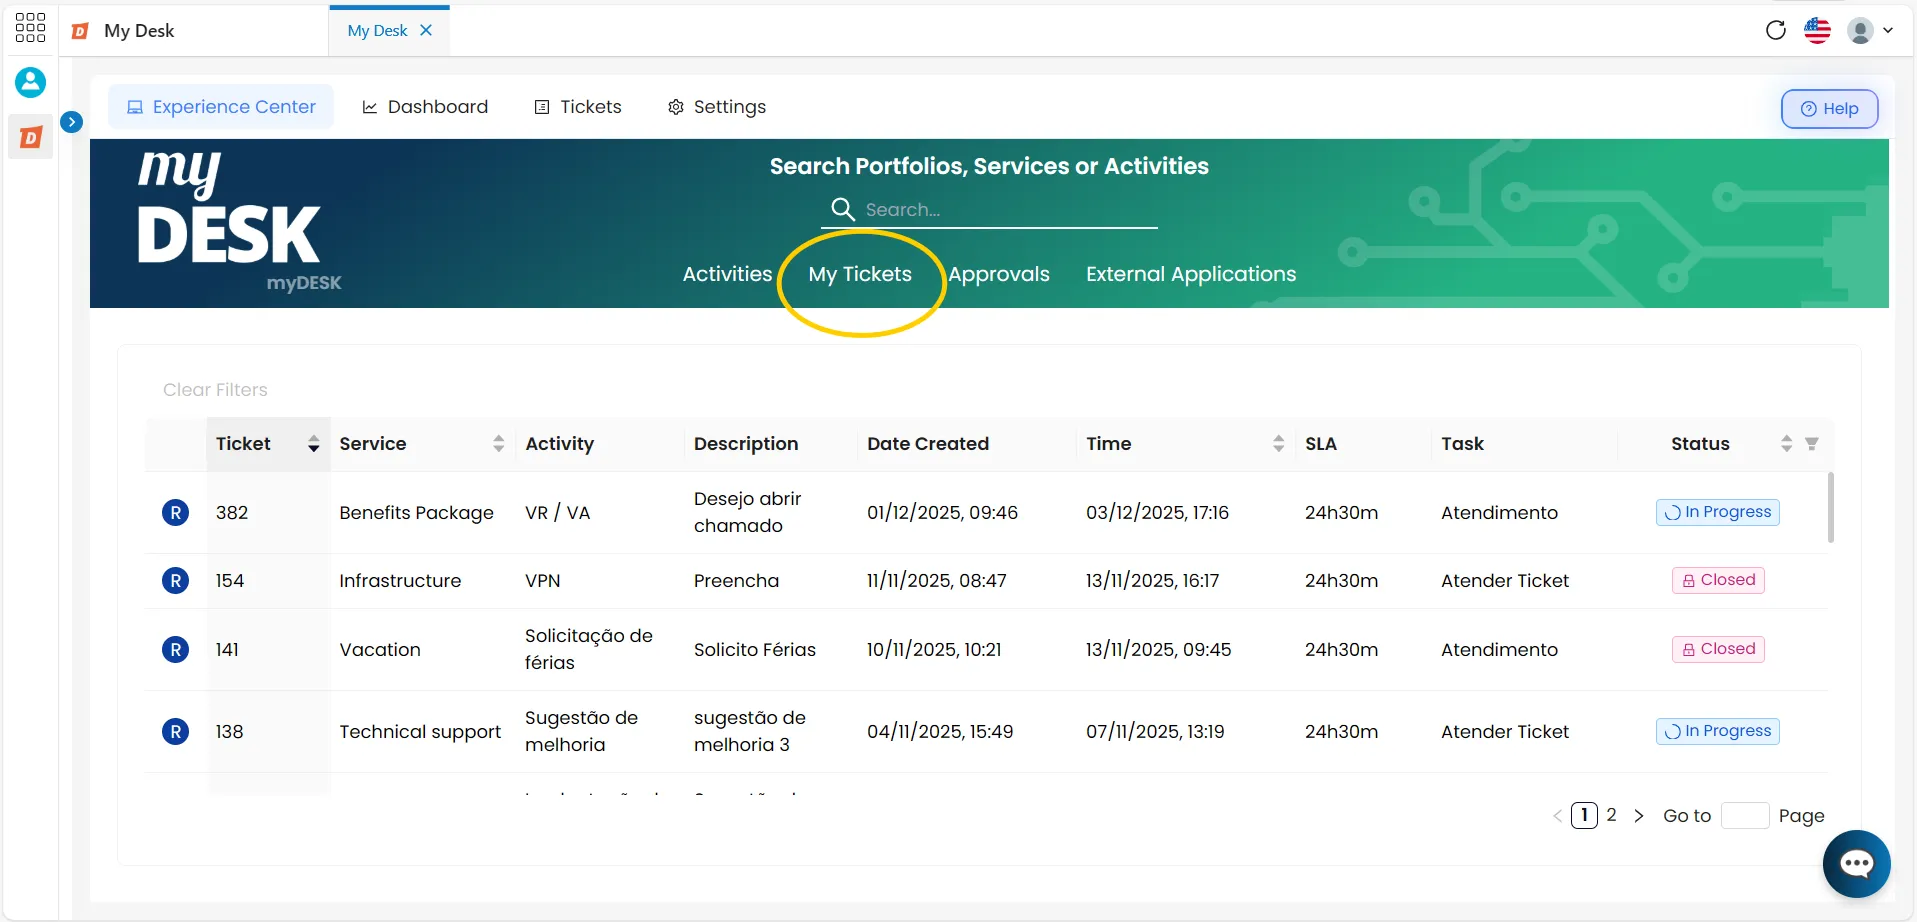
Now all you have to do is wait for the service to be completed. To track the progress, access the Approvals or My Tickets tabs in the Experience Center.
2 - Selecting the Contract
With the Multi-Contract functionality, it's possible for the same activity to be linked to more than one contract—for example, when your company serves different clients with distinct agreements. In this case, when clicking on an activity to open a ticket, the system will display a contract selection screen before the form. Here's how it works:
Contract selection screen
After clicking on the activity, if there is more than one contract available, a screen will be displayed showing the contracts linked to that activity. Each contract appears with its name and description.
Select the correct contract.
Click on the contract to which this request belongs. The selected contract will be highlighted.
Select the correct contract.
Click on the contract to which this request belongs. The selected contract will be highlighted.
📋 The contract defines the rules of your service.
The contract you choose determines the service schedule, the timeframe (SLA), and which team will be responsible for your ticket. Always select the correct contract to ensure your request is handled according to the agreed terms.
📌 Activity with a single contract:
If the activity is linked to only one contract, the selection screen will not appear. The system will automatically associate the ticket with the contract, and you will go directly to the form.
3 - SLA types
There are two types of Service Level Agreements (SLAs) that can be configured for an activity. The type appears on the ticket opening form and determines how you indicate the priority of your request.
⏱ Single-Time SLA
The response time has already been set by the team. You don't need to choose any value — just fill out the form and open a ticket.
⚖️ SLA with timelines
You choose the impact and urgency of the request. The system automatically calculates the deadline based on these values.
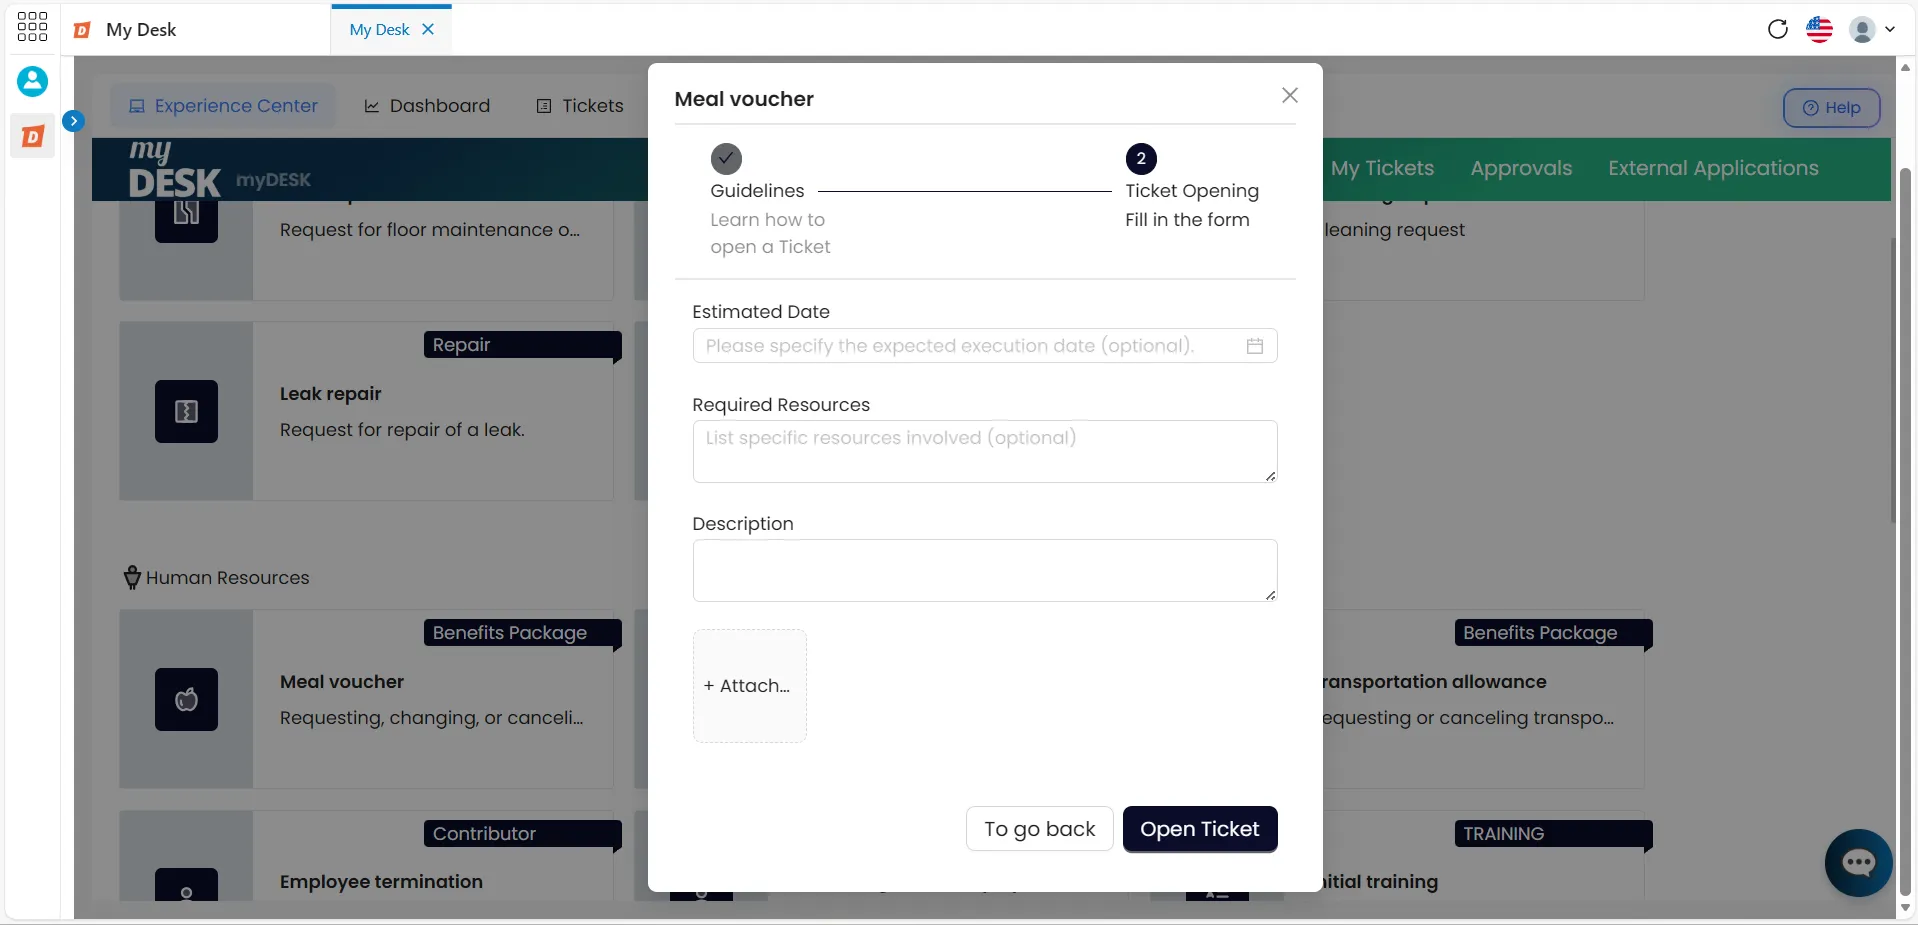
3.1 - How to fill out — Single-time SLA
Click on Fill out form
The activity form will be displayed.
Fill in the information.
Please provide the requested information according to the chosen activity.
Click on Open ticket.
The ticket will be opened with the deadline automatically defined by the activity settings.
3.2 - How to fill out an SLA with times
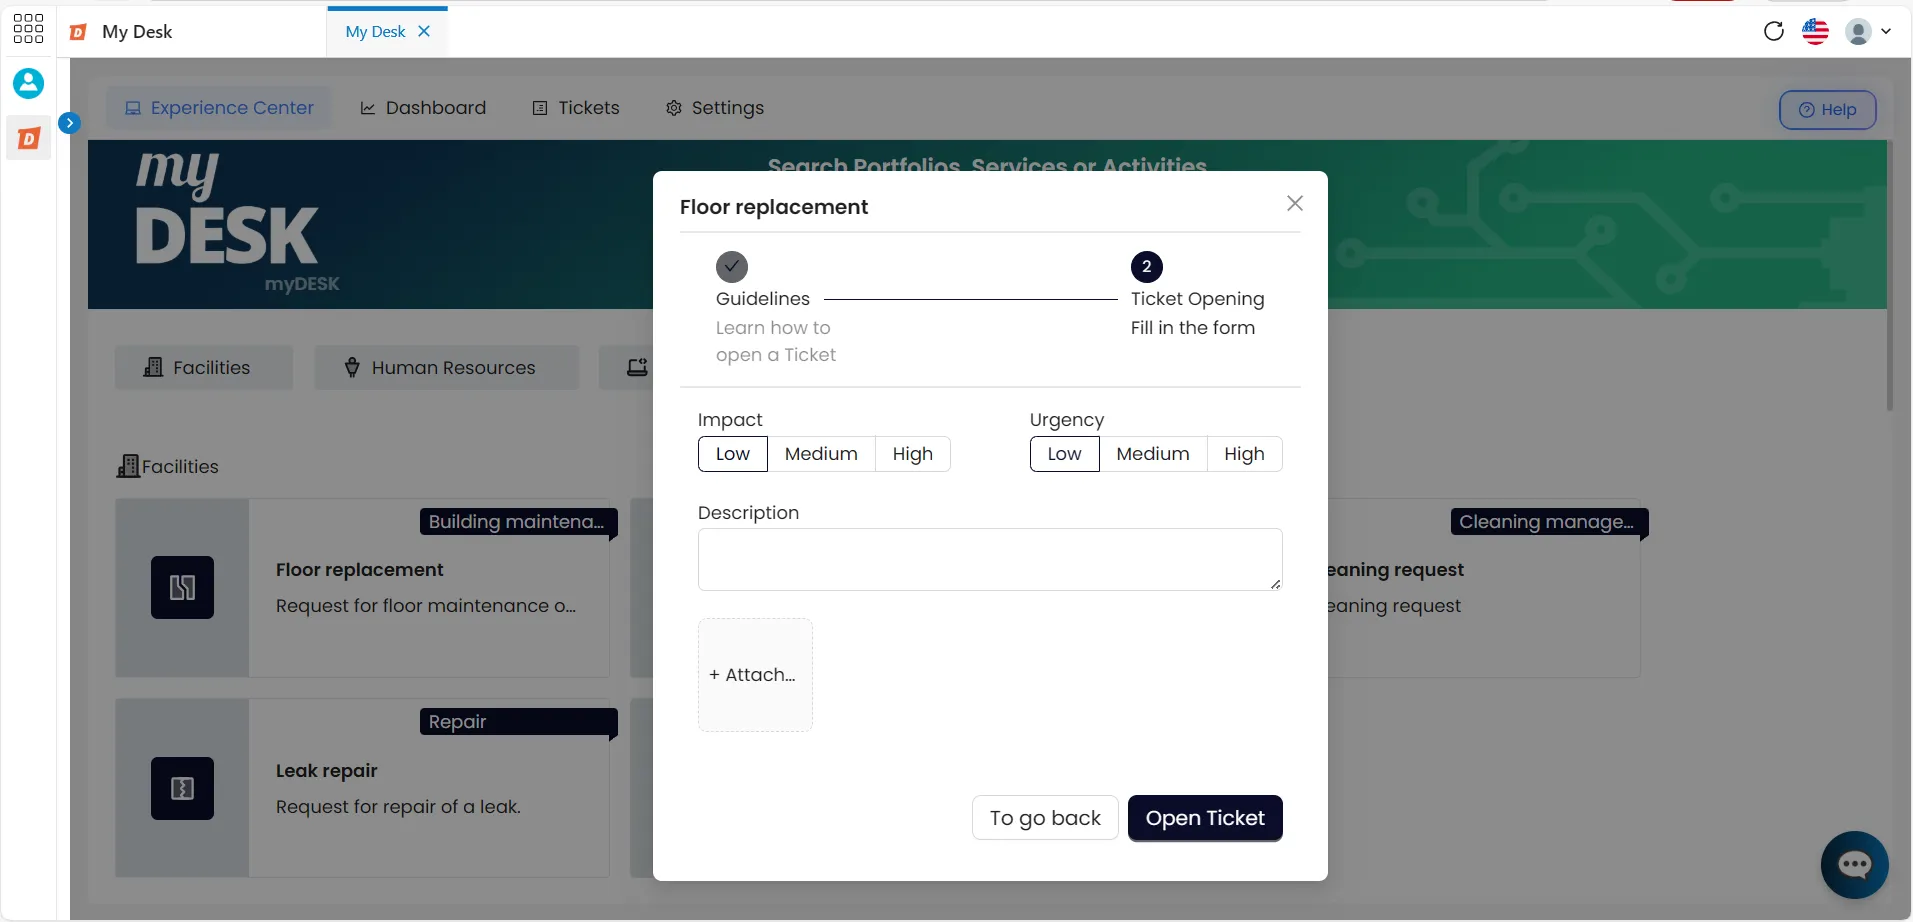
Click on Fill out form
The activity form will be displayed with the impact and urgency fields.
Define the impact
Choose between: Low, Medium, or High. The impact represents how much the situation affects your work or your team's work.
Define the urgency
Choose between: Low, Medium, or High. Urgency represents how quickly you need the problem resolved.
Fill in the remaining information
Please provide the requested information according to the chosen activity.
Click on Open ticket
The system will automatically calculate the deadline based on the combination of impact and urgency you selected. See how this calculation works in section 6 of this page.
⚠️ Attention:
Check the Service Level Agreement (SLA) section at the bottom of the page to understand how impact and urgency are calculated and what timeframe each combination generates.
Your ticket has been created, now just wait for the service to be completed!
Boxes marked with (*) are required.
To check the status of your request, click on the ApprovalsApprovals or My ticketsMy Tickets tabs.
1
2
4 - Email Notification

My Desk automatically sends email notifications in the following situations:
📬 Ticket opening
When a new ticket is registered in the system
💬 New comment
When you or the team makes or receives a comment on the ticket.
⏸️ Ticket suspension
When the ticket is placed on hold.
▶️ Ticket reactivation
When a ticket becomes serviceable again after being suspended.
✅ Ticket closing
When the service is completed and the ticket is closed.
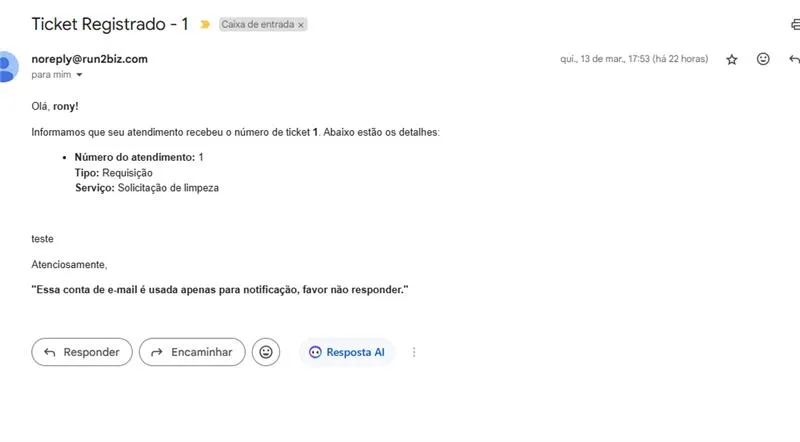
4.1 - What's in the email?
- 🔢 Service number
- 📋 Call type
- 🛠️ Service requested
- 👤 Responsible for the ticket
- ⭐ Link to the satisfaction survey (once the ticket is closed)
4.2 - Personalização do e-mail
Your emails will arrive personalized once you finalize the customization of your My Desk with your company's theme and logo. Before customization, emails arrive in the platform's default format, without any visual identity. As soon as you customize My Desk with your company's theme and logo, the email will display your branding.
Below is an example of a standard email delivery template without a theme or branding.
Once you customize My Desk with your company's theme and logo, it will look similar to the example below:

5 - Satisfaction survey
When a ticket is closed, the requester automatically receives an email with a satisfaction survey about the service received. The email contains:
- 🔘 Button to access the satisfaction survey;
- 📋 Ticket details;
- 📝 Description of the request;
- ✅ Solution with the closing opinion.
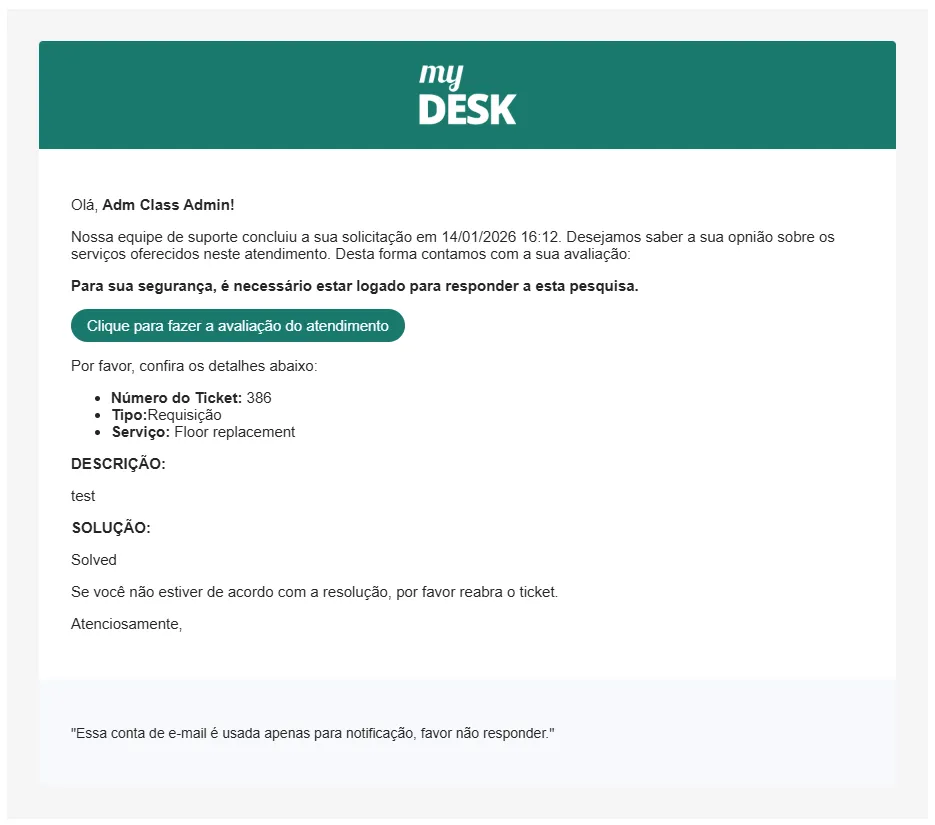
Clicking the survey button in the email will automatically open a new tab in your browser with a Satisfaction Survey form.
Atenction
To respond to the satisfaction survey, you must be logged into My Desk using the same browser where the link was opened. This ensures the security of your response.
The Satisfaction Survey will be presented as shown in the image below.

5.1 - Survey questions
How satisfied are you with the ticket service?
😞Very dissatisfied - 🙁Dissatisfied - 😐Indifferent - 🙂Satisfied - 😄Very satisfied
Comment / suggestion for improvement
Optional — leave your comment
6 - Response times - SLA

When creating a ticket with an SLA that includes deadlines, you choose an impact value and an urgency value. With this combination, the system automatically calculates the appropriate timeframe for addressing your request.
6.1 - Understand how this calculation is done.
The Impact and Urgency values are: Low, Medium, and High. Each value has a related number. The sum of these numbers gives the response time. See below:
Level | Impact | Urgency |
|---|---|---|
Low | 1 | 1 |
Average | 2 | 2 |
High | 3 | 3 |
6.2 - Relationship between result and time
There are 5 service times, where:
- Time 1 corresponds to the lowest SLA (fastest service)
- Time 5 corresponds to the highest SLA (longest service time)
- The other times, from 2 to 4, increase successively until reaching the highest, 5
Examples: fictitious times
Time | Capture (example) | Resolution (example) |
|---|---|---|
Time 1 — mais rápido | 00:15 min | 00:40 min |
Time 2 | 01:00 h | 02:00 h |
Time 3 | 06:00 h | 24:00 h |
Time 4 | 24:00 h | 48:00 h |
Time 5 — mais lento | 30:00 h | 72:00 h |
When opening a ticket, you choose an Impact and an Urgency.
Add the impact value to the urgency value. The result determines the response time that will be applied.
See below for the relationship between them.
🧮 Tabela de combinações
Low (1) + Low(1) = Result (2) Tempo 5 - Longest time
Low (1) + Medium (2) = Result (3) Time 4
Low (1) + High (3) = Result (4) Time 3
Medium (2) + High (3) = Result (5) Time 2
Hight (3) + High (3) = Result (6) Tempo 1 - Shortest time
💡 Practical example:
If you choose a Low Impact (1) with a High Urgency (3), it means that the sum will be 1+3=4 Therefore, the result of 4 will be used for response time number 3 and will be related to the SLA defined at time 3 (in the example given here, the SLA would be 06:00 hours for capture and 24:00 hours for resolution)
See below for another way to calculate the sum and relationship between the values and service times:
7 - See SLA in Ticket

To view the Service Level Agreement (SLA) applied to a ticket, follow the steps below:
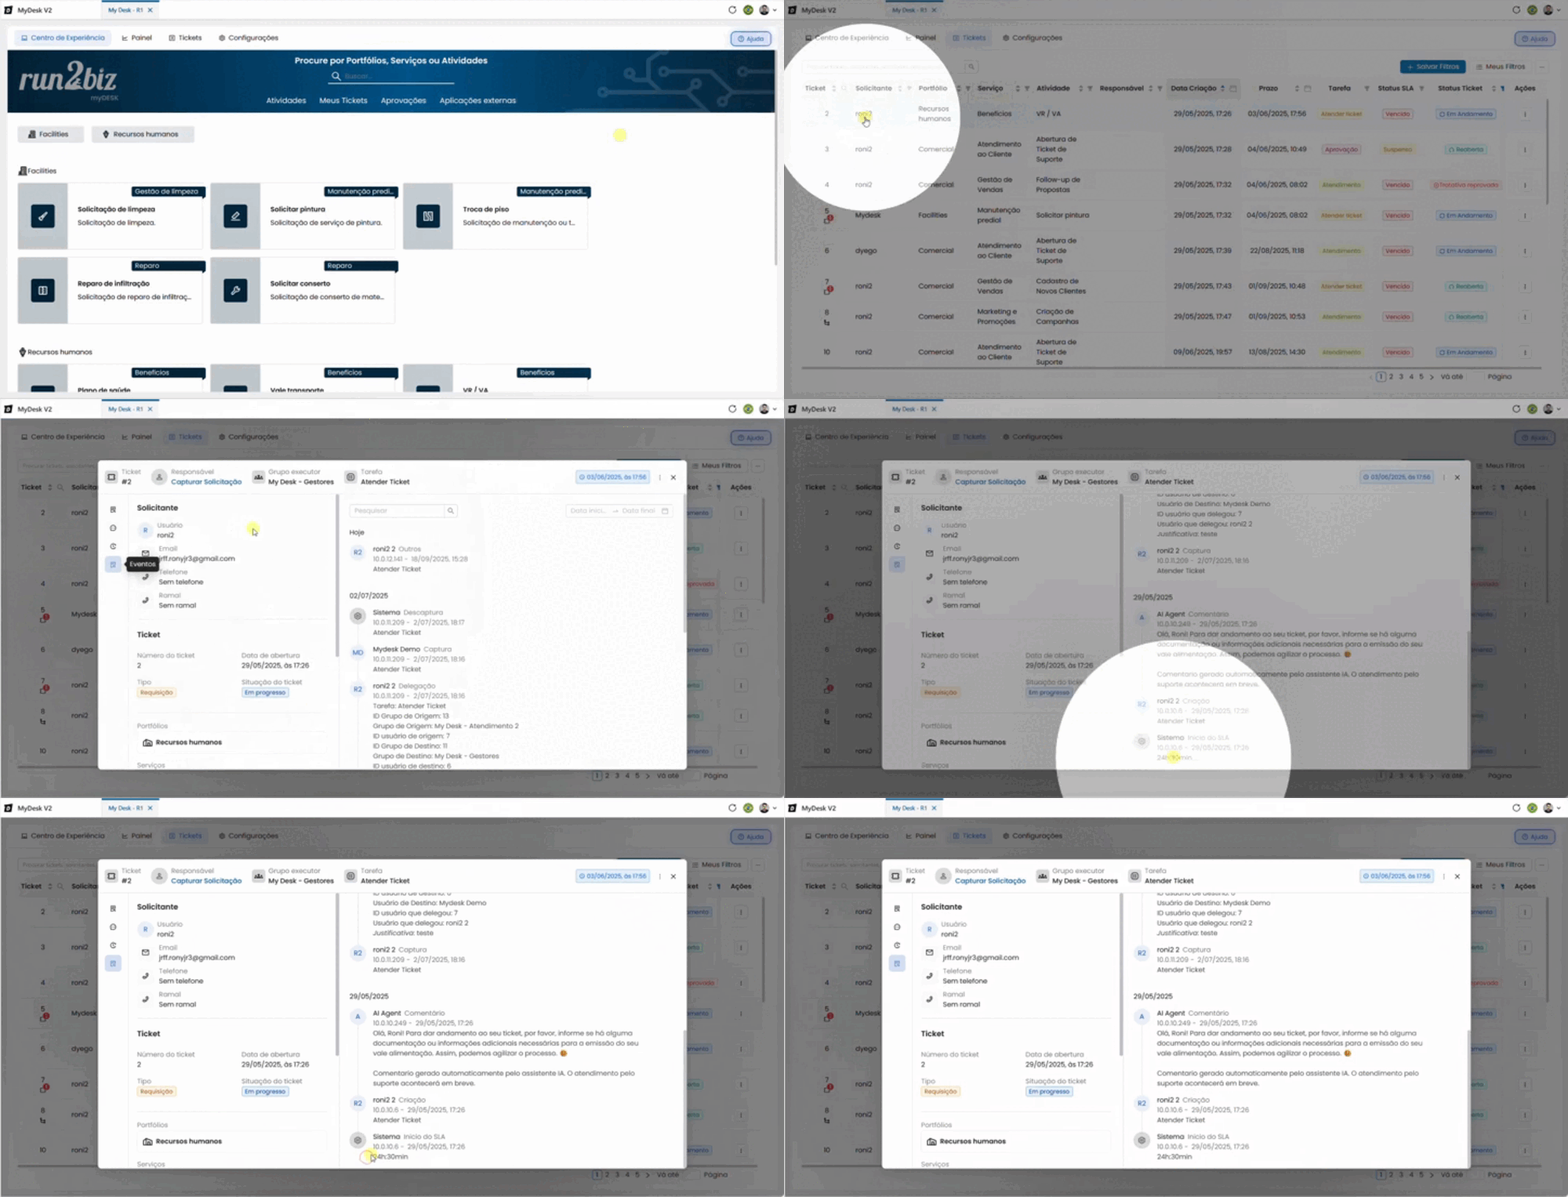
Access the Tickets tab.
In the top menu, click on Tickets.
Open the ticket
Click on the ticket you wish to check. A window with the ticket information will open.
Access the Events menu.
In the side menu of the ticket window, click on Events.
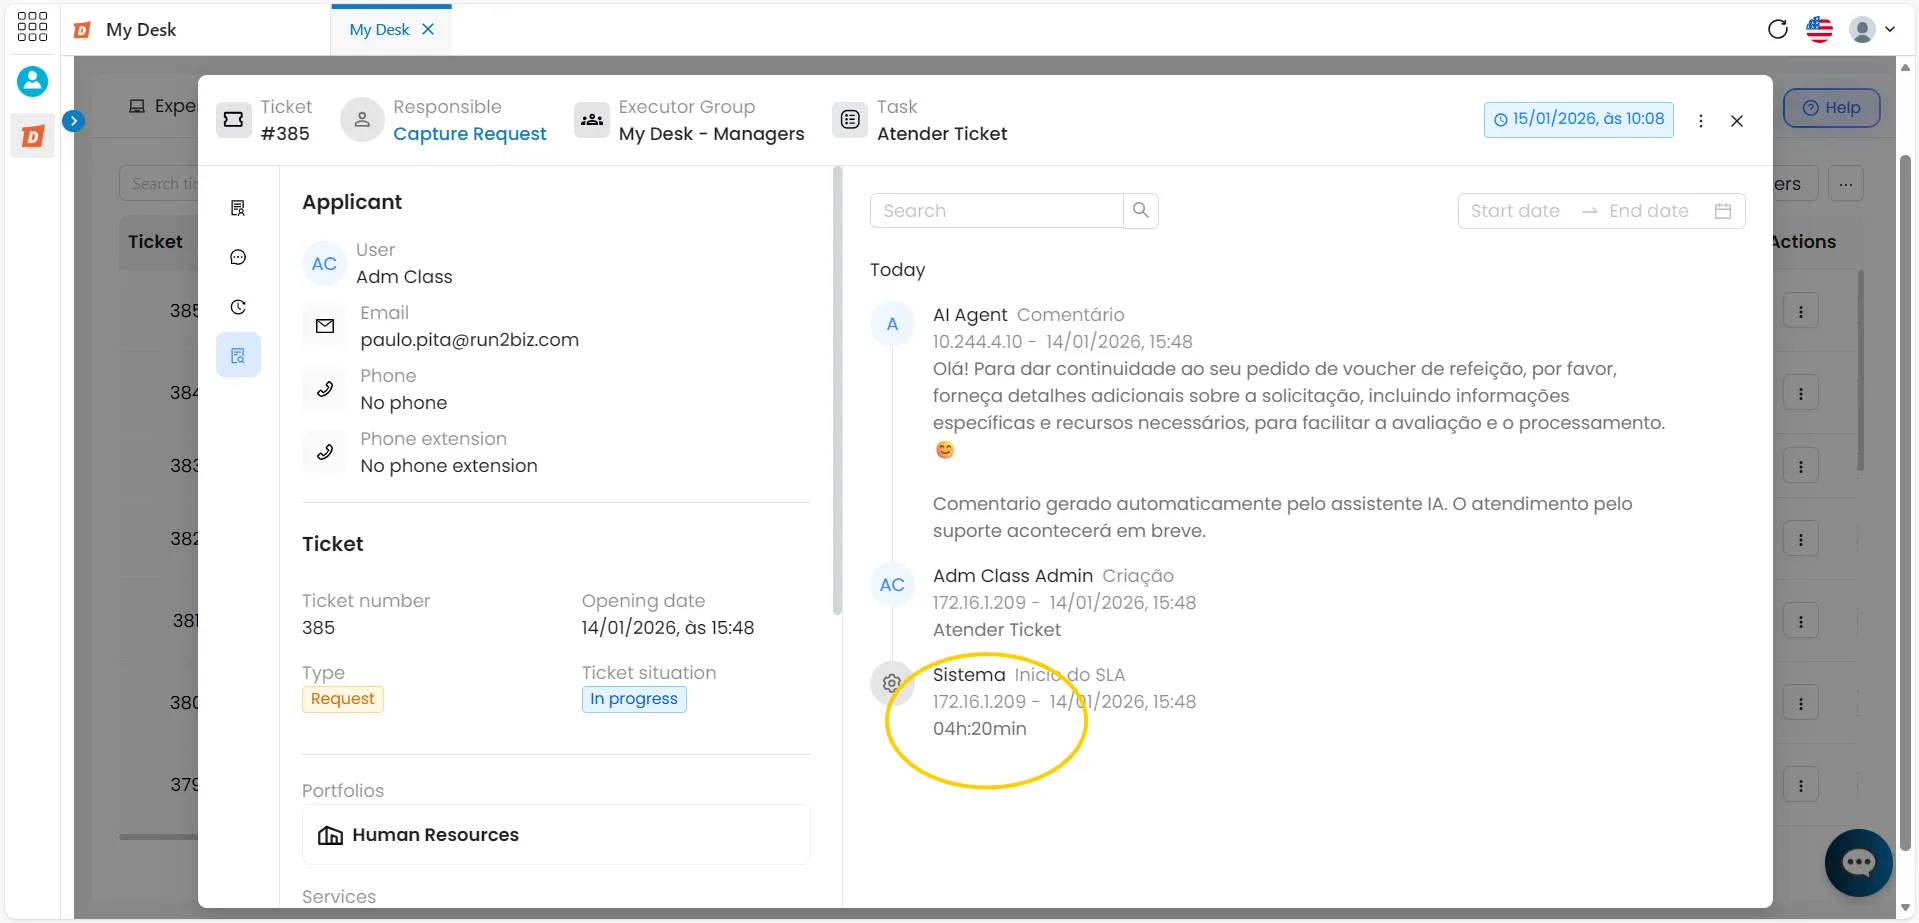
Check the deadline.
The SLA time appears in the last record displayed on the right side of the window.
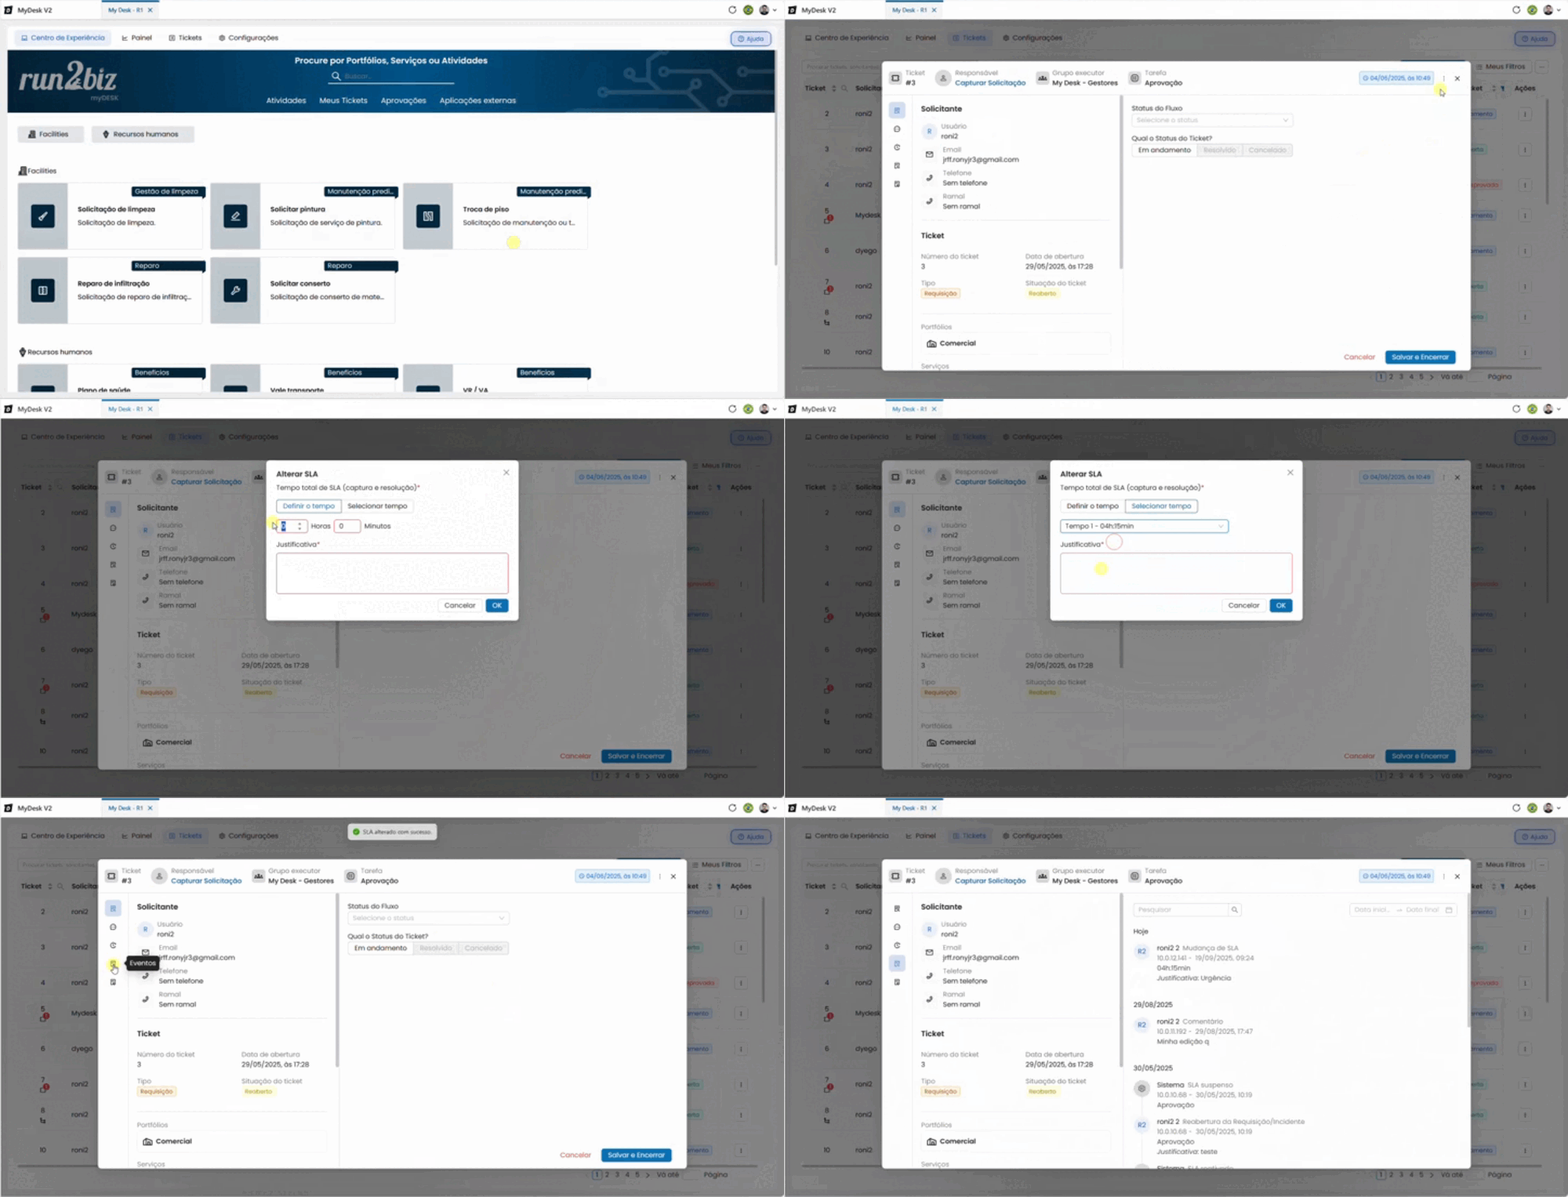
8 - Change the SLA

It is possible to change the SLA of a ticket after it has been opened, when necessary. There are two ways to do this:
8.1 - Change SLA within the ticket.
Open the ticket
In the Tickets tab, click on the ticket you want to change. The ticket information window will open
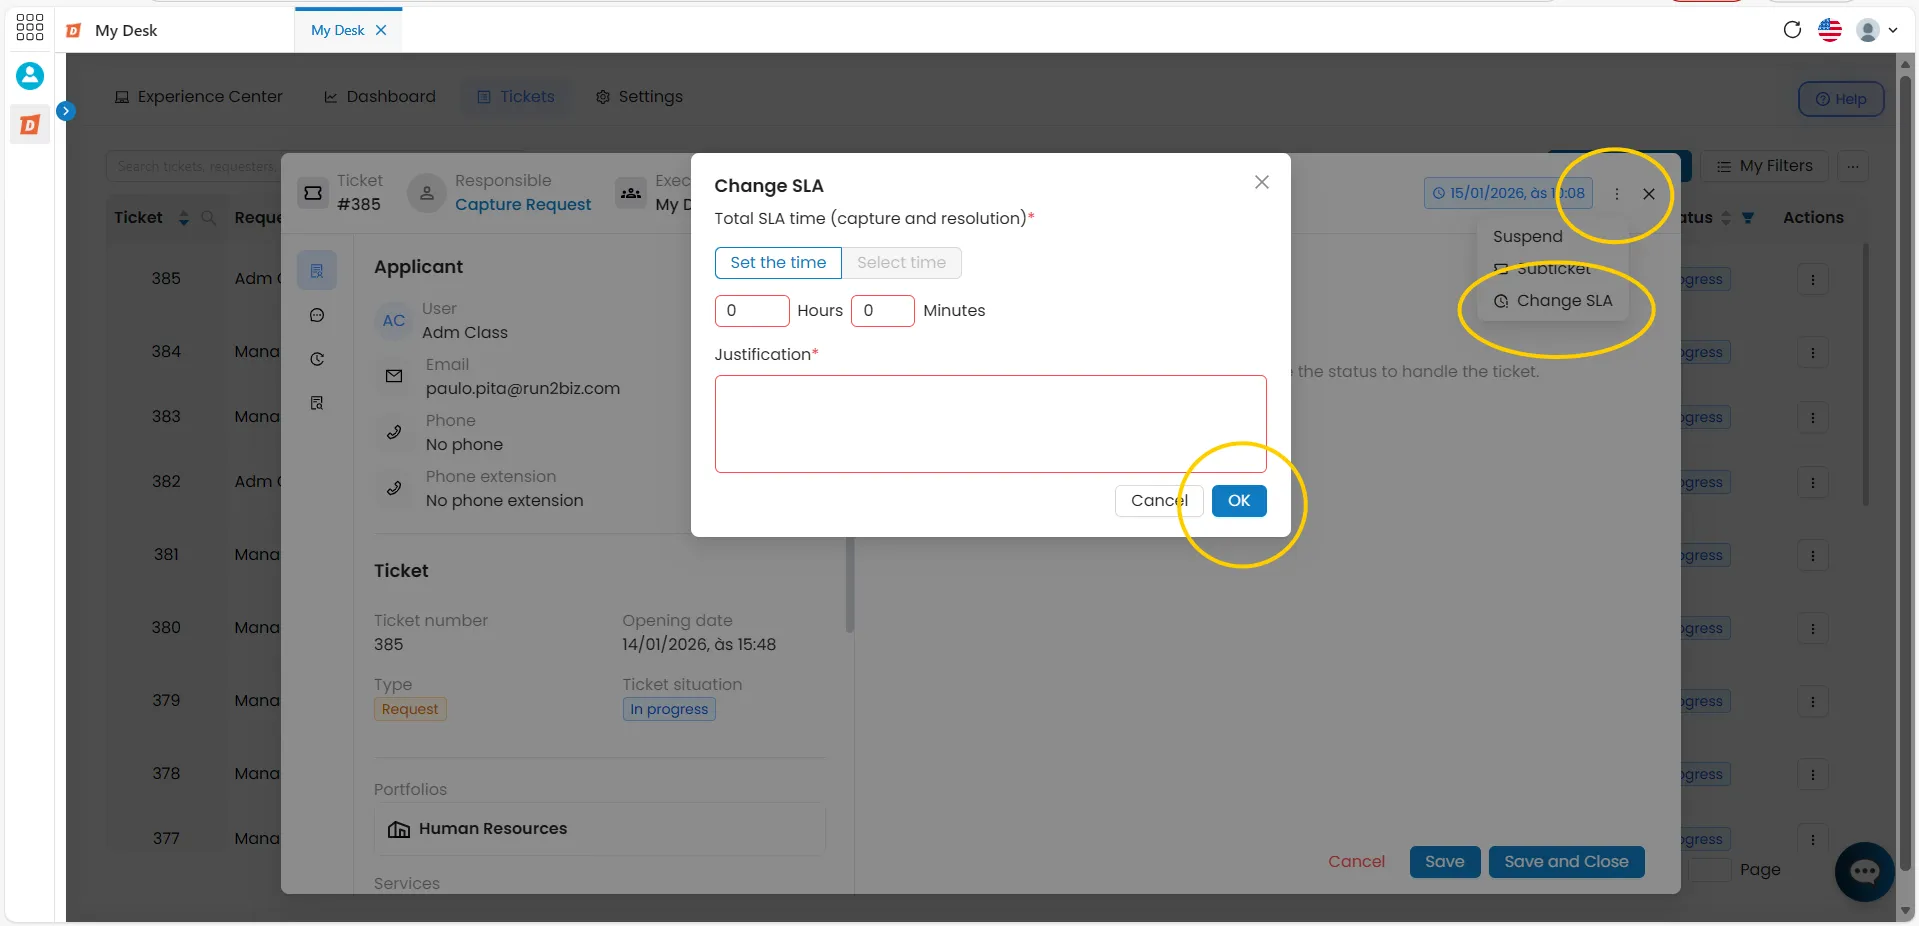
Click on the three dots
In the upper right corner of the ticket window, click the three-dot button (···). Three buttons will appear below
Click on Change SLA
A window will open with two options for modification.
Choose the method of change
Set the time — you manually set the total SLA time Select time — you choose from one of the 5 pre-set times
Please provide a justification
It is mandatory to provide a justification for the SLA change
Click OK, then click Save and close
The change will be applied to the ticket
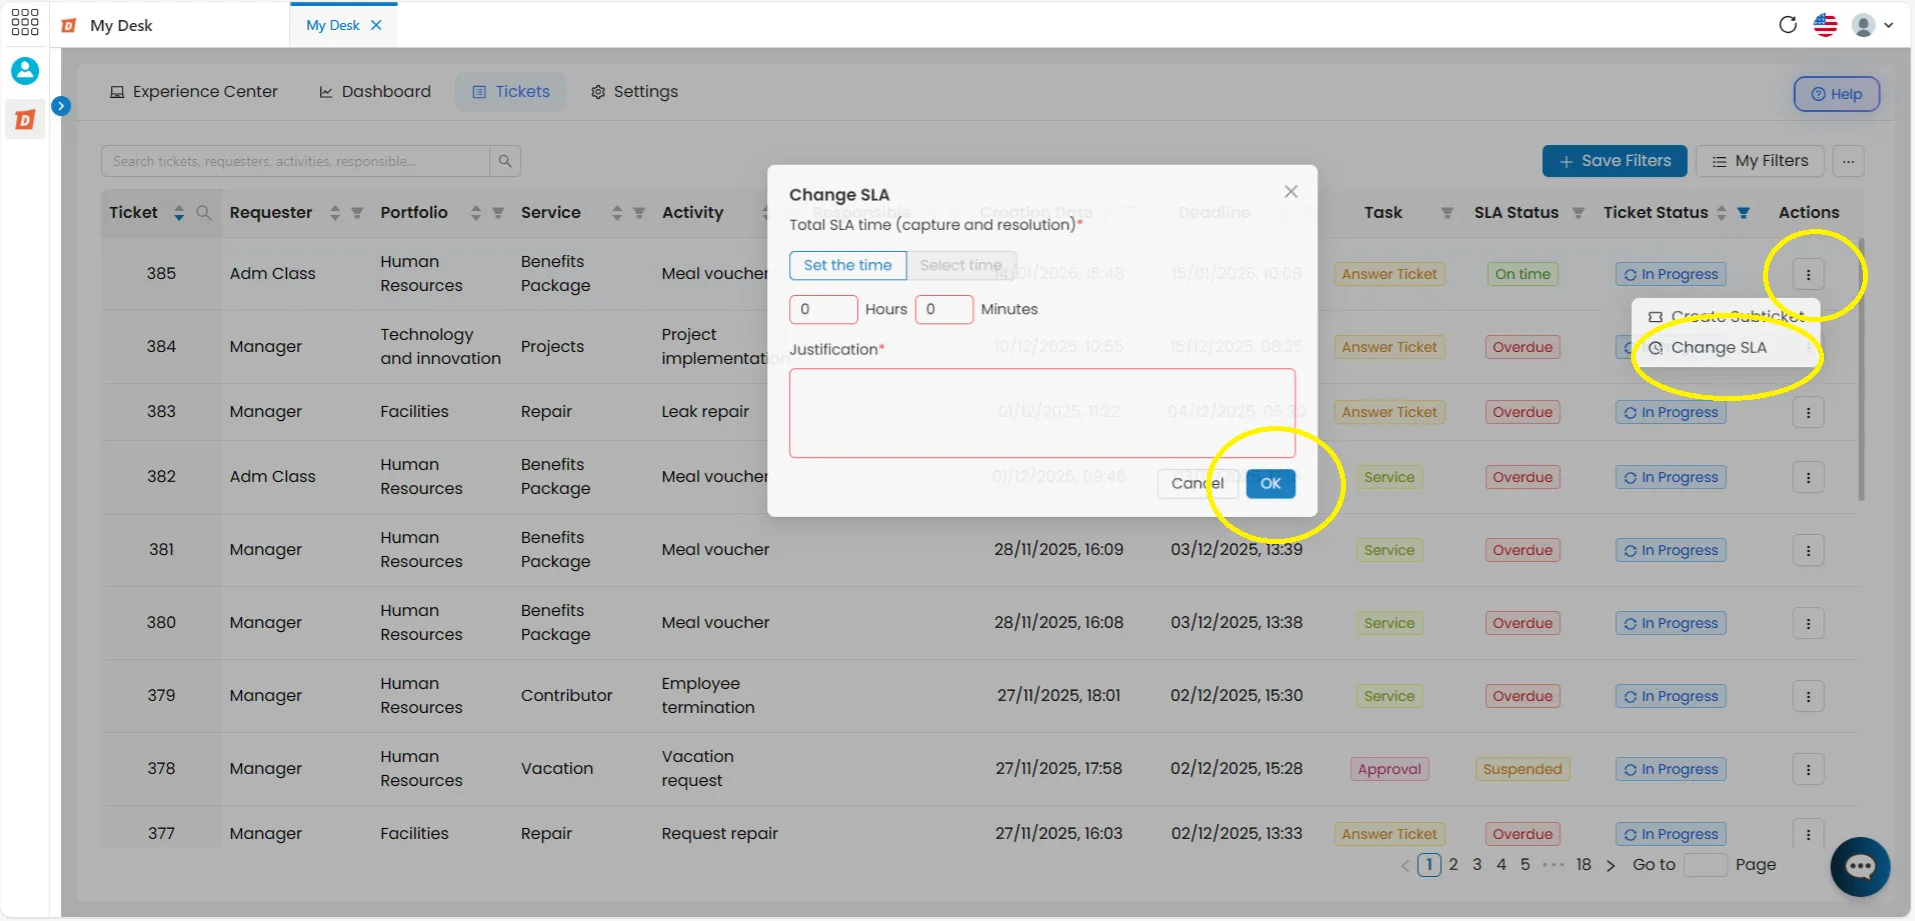
8.2 - Change the action button in the ticket list.
Access the Tickets tab.
In the top menu, click on Tickets.
Click the action button on the ticket.
At the end of the desired ticket line, click the three-dot button (···). Two buttons will appear below.
Click on Change SLA
A window will open with the same modification options described in Form 1.
Choose, justify, and save.
Select the type of change, provide the required justification, click OK, and then click Save and Exit.