Contracts
✨New in this version Only Administrator
The Contracts feature allows My Desk to operate with more than one service contract per company. Prior to this feature, the system worked with a single standard contract — called the Main Contract — which was automatically configured at the time of platform acquisition.
With Multi-Contracts, you can register additional contracts and link them to specific portfolios and activities, accurately reflecting your organization's actual contractual structure.
📐Hierarchy of objects related to contracts
Contract → Portfolio → Service → Activity
📌 Main Contract:
The Main Contract is automatically created when My Desk is purchased and cannot be edited or deleted. It serves as the default contract for all activities that do not have a specific contract configured. The Main Contract continues to function normally—no reconfiguration is necessary.
1 - Why use Multi-contracts?
The Multi-Contract feature resolves common situations in companies that serve more than one client or have contracts with different scopes. See what you can achieve:
Separate contracts per client
Companies with multiple clients can have separate contracts for each one, with independent dates, values, and scopes.
Controle correto de faturamento e SLA
As atividades de cada portfólio passam a ser registradas e controladas no contrato correto, evitando erros de faturamento ou descumprimento de SLA.
Automatic ticket association
Tickets generated by My Desk are automatically associated with the contract configured in the activity — without manual intervention.
Backward compatibility
The Main Contract continues to function normally for all activities that were already configured. There is no need to reconfigure anything that already existed.
2 - How to access
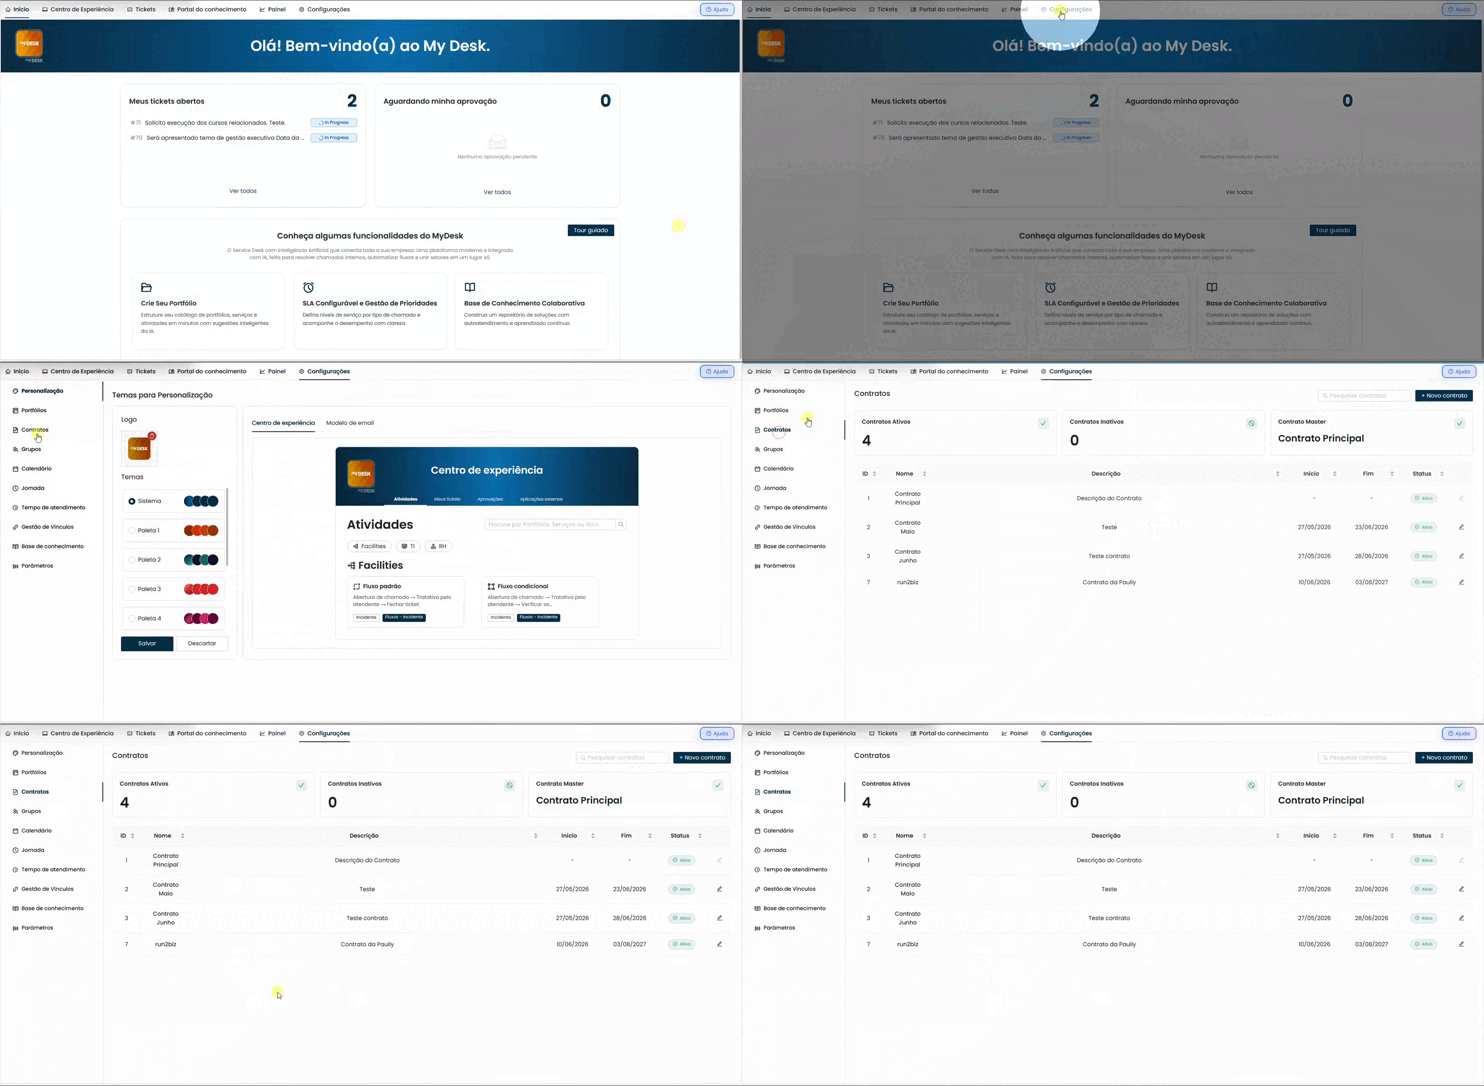
To access the contracts screen, follow the steps below:
Open Settings
In the top menu, click on ⚙️ Settings.
Click on Contracts
In the left-hand menu, click on Contracts. You will be taken to the main contracts screen.
2.1 - What you see on the Contracts screen
Totalizer cards
At the top of the screen, three cards display a quick summary: the number of Active contracts, the number of Inactive contracts, and the name of the Main Contract.
Totalizer cards
At the top of the screen, three cards display a quick summary: the number of Active contracts, the number of Inactive contracts, and the name of the Main Contract.
Contract table
Lists all registered contracts with the following columns: ID, Name, Description, Start Date, End Date, Status, and Actions (edit icon).
⚠️ No access to the menu?
If the Contracts option does not appear in the side menu, your user may not have an Administrator profile. Contact the person responsible for system administration.
3 - Registering a new contract
To create a new contract, follow the steps below:
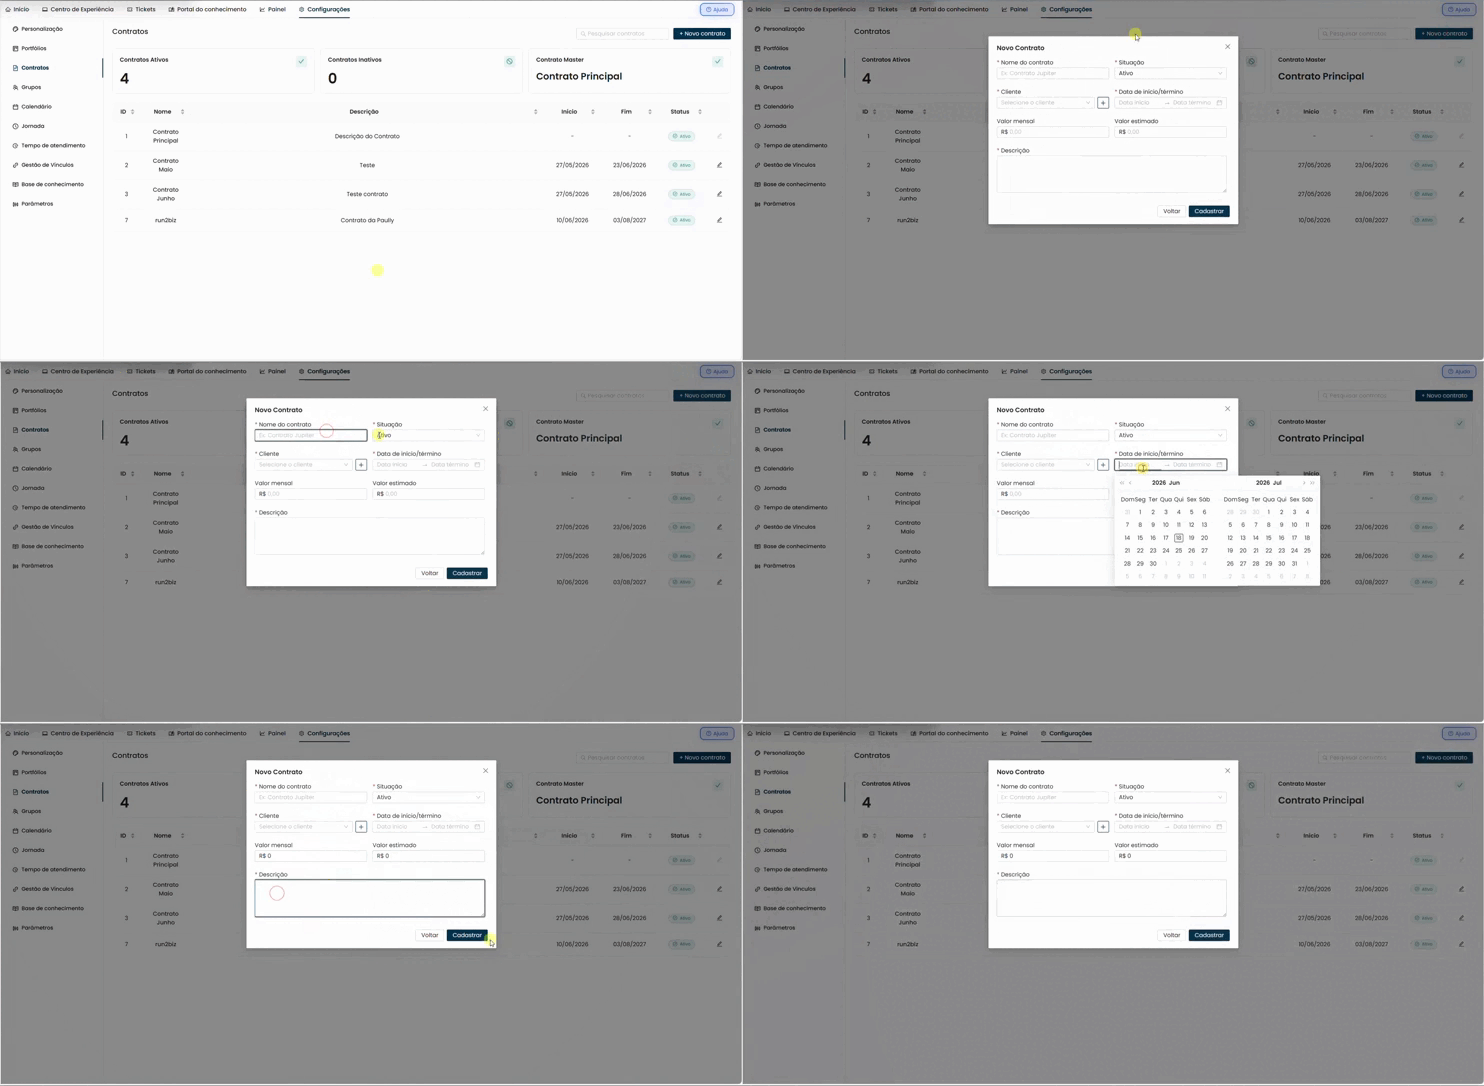
Click on New Contract
The button is located in the upper right corner of the screen, next to the search field. A form will open in the center of the screen.
Fill in the fields
Please provide the contract details as described below. Fields marked with a red asterisk (*) are required.
Select or register the customer
Select the client linked to the contract from the dropdown list. If the client does not yet exist in the system, click the + button next to the field to register them without leaving the form. See details in section 4.
Click on Register
After filling in all the required fields, click Register to save. The contract will immediately appear in the Contracts screen table.
3.1 - Form fields
Contract name mandatory
Unique identifier of the contract — usually the number or code as it appears on the formal signed document.
Example: CTR-2026-001 or Company ABC — Technical Support
Situation mandatory Default: Active
Defines whether the contract is active or terminated. Select Active for active contracts or Inactive for terminated or suspended contracts. Inactive contracts remain registered in the system, but do not appear as an option when opening new tickets and do not allow new links to activities.
Customer mandatory
Company or person linked to this contract. Use the search to find them by name. If the client does not exist, click the + button next to the field to add them. To correct data for an already registered client, click the pencil icon ✏️ that appears next to the client's name in the dropdown list.
Period — Start date / End date mandatory
Contract validity. Select the start date and end date on the calendar. These dates serve as a reference for control and monitoring.
Format: DD/MM/YYYY
Monthly value (R$) optional
Monthly fee for the contracted service. This can be filled in later by editing the contract.
Example: R$ 5,000.00 — use a period to separate thousands and a comma for cents.
Estimated value (R$) optional
Valor total estimado do contrato. Usado para controle financeiro e relatórios gerenciais. Pode ser preenchido depois via edição.
Description (Object) mandatory
Descriptive text of the contract scope — what will be provided or supplied to the client. This field is important for correctly identifying the contract in reports and in the contract selection window when linking activities.
Example: Level 1, 2, and 3 IT technical support for 200 users.
4. Registering a new customer
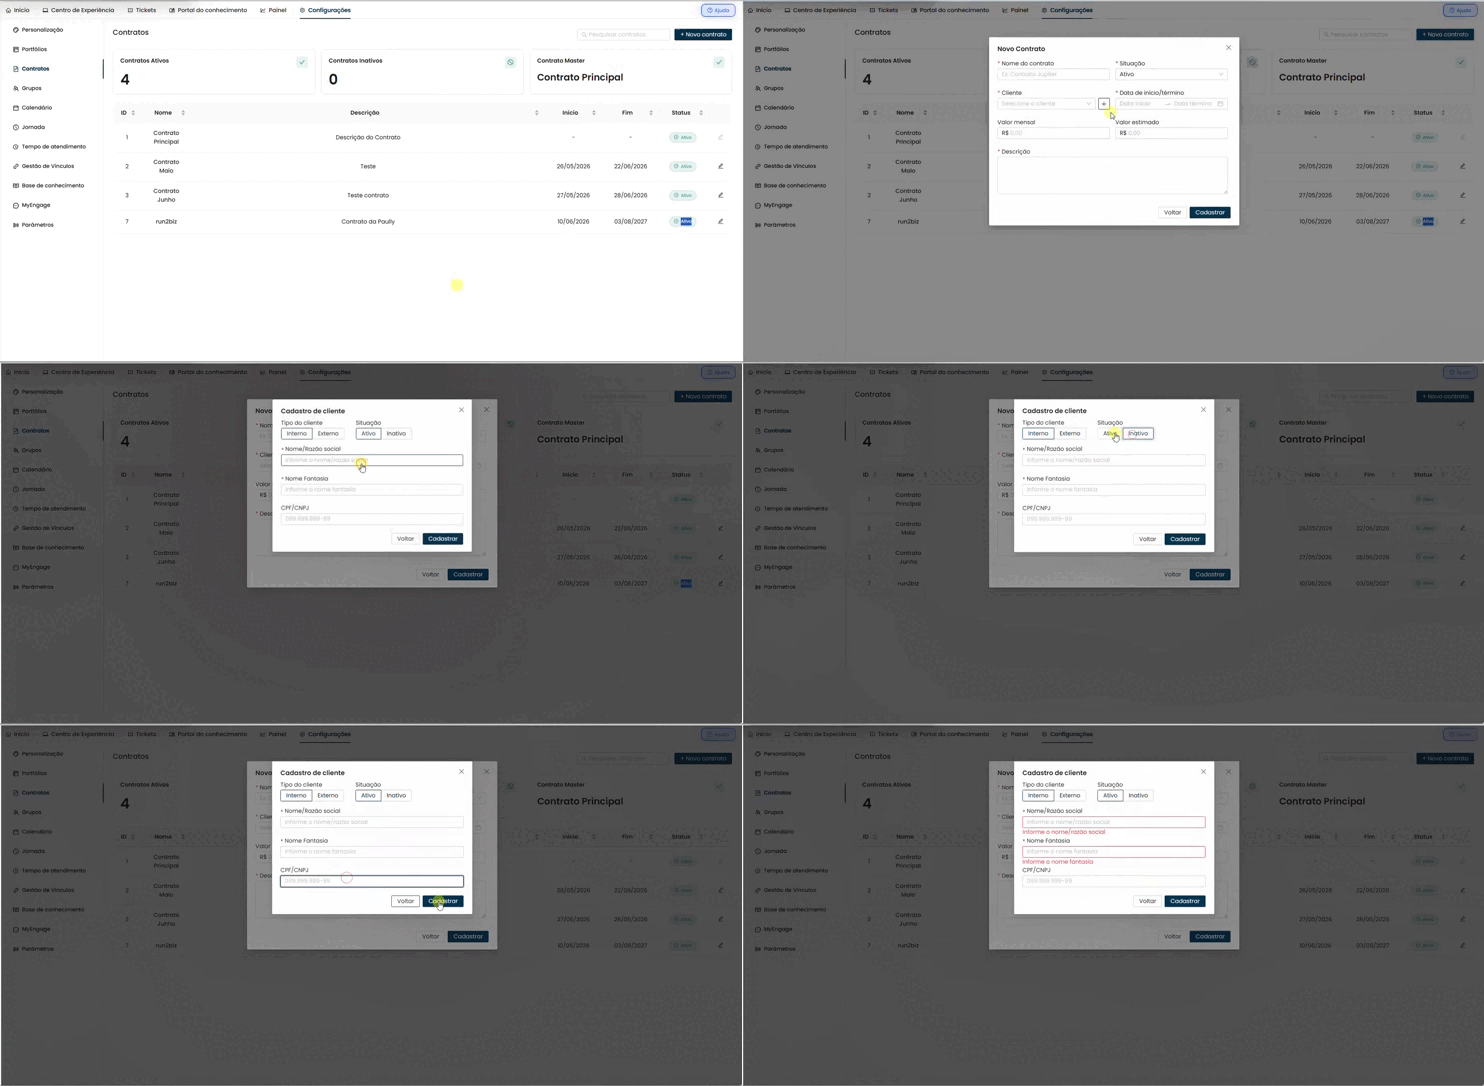
If the customer doesn't already exist in the system, you can register them directly from the contract form, without having to leave the screen.
Click the + New Contract button
In the Customer field, click the plus (+) icon to the right of the selection field. A second form will open.
Fill in the customer details
- Customer type:
- Internal or external
- Situation:
- Active or Inactive
- Name / Company Name
- Trade Name
- CPF (brasilian identidad) / CNPJ (Brazilian corporate identity)
Click on Register
The customer's registration will be saved and automatically selected in the Customer field of the contract form. You can continue filling in the other fields as normal.
💡 Tip:
To correct the data of an already registered client, click on the pencil icon ✏️ that appears next to the client's name in the Client field's dropdown list. This allows you to edit without leaving the contract form.
5 - Editing or deactivating a contract
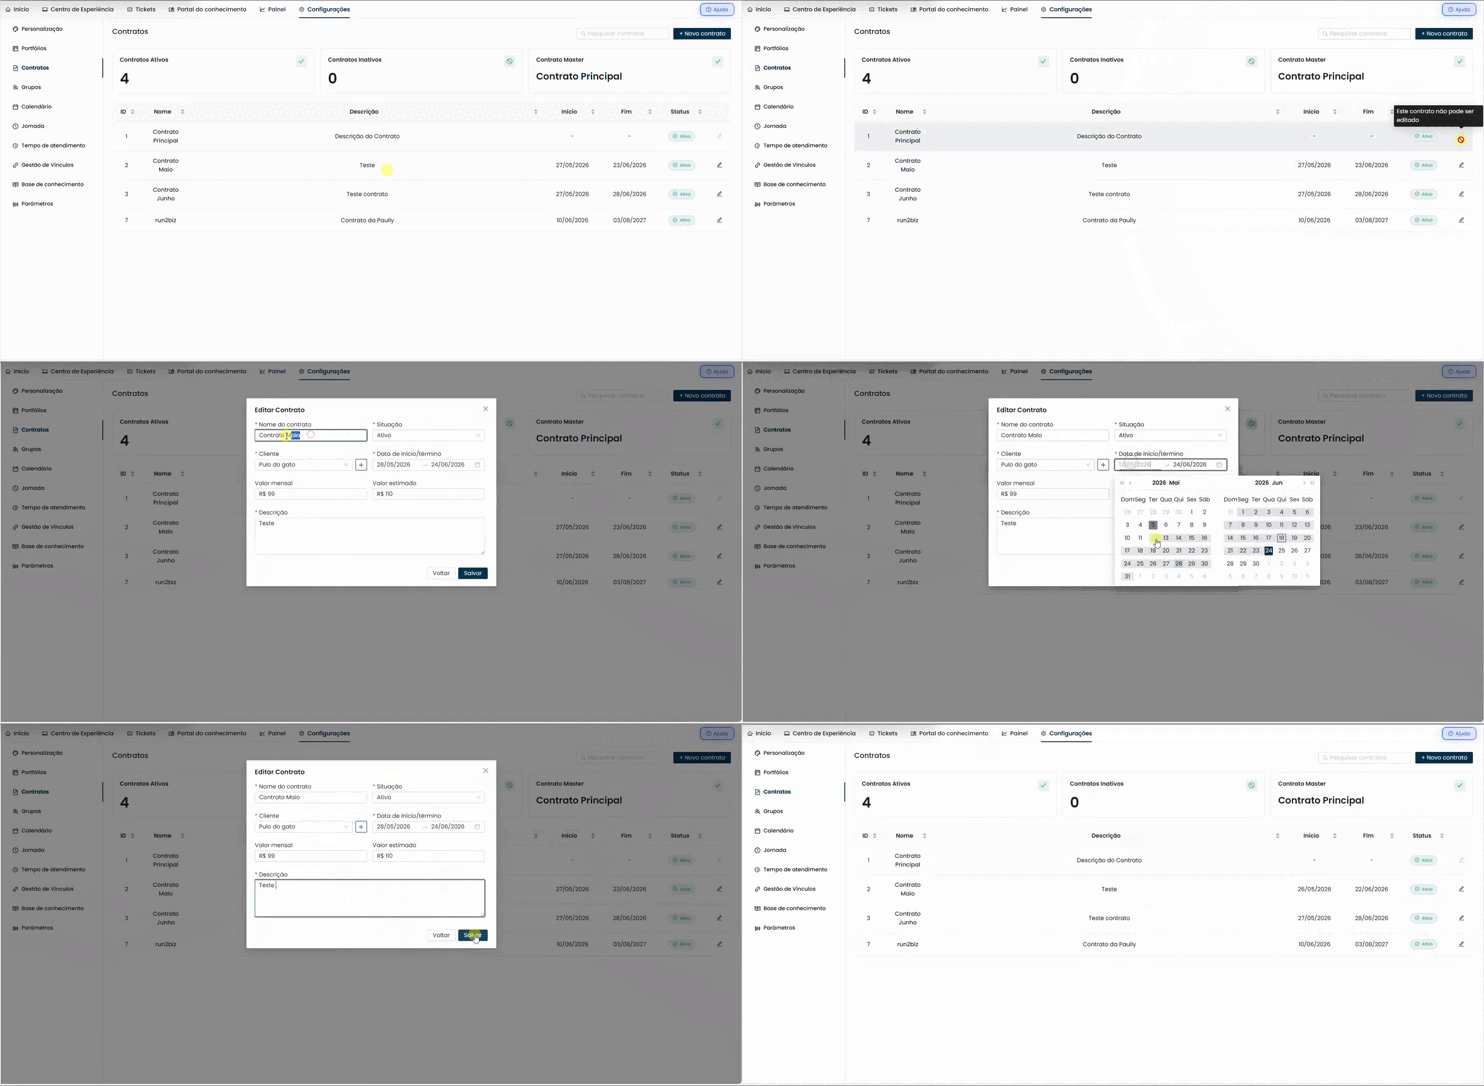
Any contract can be edited at any time — except for the Master Contract, which cannot be changed.
To edit, follow the steps below:
Locate the contract
On the Contracts screen, use the search field to filter by name or description and locate the contract you want to edit.
Click the edit icon
In the Actions column (last column of the table), click the pencil icon ✏️ in the row of the desired contract. The form will open with the data already filled in.
Faça as alterações
Modifique apenas os campos necessários. Para inativar o contrato, altere o campo Situação de Ativo para Inativo.
Click Save
The changes will be saved and the table updated automatically.
📌 What happens when a contract is deactivated?
Activities already linked to the contract continue to function normally — ongoing tickets are not affected. Deactivation only prevents new links from being created for that contract. It is recommended to review the linked activities before deactivating.
To close a contract without deleting it from the system, change the Status field to Inactive. This preserves the history and prevents the contract from appearing for new requests.
⚠️ Master Contract blocked:
The Main Contract (ID 1) cannot be edited. The edit button is disabled for this record. This restriction ensures that the system's default contract remains stable. It is not possible to permanently delete contracts — termination is done by deactivation.
6. Linking contracts to activities
The link between a contract and an activity defines how that activity will be fulfilled within the context of that contract: what is the service schedule, what is the SLA, what are the executing and approving groups, and what workflow will be followed.
This configuration is done in Settings → Portfolioa , within the settings panel for each portfolio — not on the Contracts screen.
To configure, follow the steps below:
Go to Settings → Portfolio
In the top menu, click on Settings and then on Portfolio in the side menu.
Select the Portfolio and the Activity
Locate the desired portfolio and expand it to view the registered services and activities.
Click on Link in Activity
The system will automatically detect if the activity does not yet have any links and will open the Contract Selection Window.
Choose the contract
The window displays cards with available contracts. Each card shows the name, description (object), the number of portfolios already linked, and the status (Active). Click on the card of the desired contract—it will have a colored border indicating the selection. Use the search field at the top of the window to filter by name. The Clear filters button restores the complete listing.
Confirm your selection
Click Confirm. The link setup form will open with the contract already selected.
Fill in the configuration details and save
Configure the link fields as described below and click Save.
6.1 - Link configuration fields
Contract autofilled
Contract to which this setting applies. Automatically filled in based on the selection made in the previous step.
Start date default: current date
Date on which the link between the contract and the activity comes into effect.
Calendar
Defines the days and times when the service will be available for assistance under this contract.
Example: Weekdays from 8am to 6pm or 24/7
Service Level Agreement (SLA)
The maximum time frame for resolving service requests for this activity within this contract. Select the applicable registered SLA.
Executive Group
The team responsible for providing support. The list only displays groups associated with the selected contract. If a necessary group does not appear, check with the administrator to ensure it is correctly configured for that contract.
Approval Group optional
Team responsible for approving the resolution of the service request. Only required for workflows that demand approval.
Flow
The type of workflow the ticket will follow. The options are: Standard, With approval, or With pre-approval.
💡 Tip:
Use the search field on the contract selection screen to quickly find the desired contract when there are many registered. The Clear filters button restores the complete list.
7. Managing multiple contracts by activity
The same activity can be configured for different contracts, each with its own SLA rules, schedule, and executing group. This is useful when the same support activity needs to be handled differently depending on the client.
7.1 - Navigating between the links of an activity
When an activity is linked to multiple contracts, the panel displays a contract selector at the top. Click the selector to see all contracts linked to that activity and select the contract you want to view or edit. Calendar, SLA, and group settings change depending on the selection.
7.2 - Adding a new contract to an already linked activity
To add, follow the steps below:
Open the activity linking panel
Click the link configuration button in the activity row.
Click on Link new contract
In the contract selector at the top of the panel, click the Link new contract option at the bottom of the dropdown list.
Select the contract
The Selection Window will only display contracts that are not yet linked to this activity.
Configure and save
Fill in the configuration details for the new contract — calendar, SLA, groups, and workflow — and click Save.
💡 Regarding existing links:
When adding a new contract to an activity, nothing changes in the existing links. They continue to function normally with their original settings. New contracts are added incrementally, without impacting what is already configured.